Showing posts with label Pre-Reading. Show all posts

Saturday, September 13, 2014

Taking Over a New Class

This year I have changed classrooms and responsibilities.  I moved from my safe little classroom to take over for some teachers who left our school.  It is my job to make this classroom successful.  I am in the Spanish dual language program classroom now.  It is a mixture of children from several classrooms, but there is a core group of children who were there last year.  These children have really needed retraining this year.  About 80% of them are boys.  I have spent a lot of time during the first 3 weeks of school observing all of the children, becoming emotionally available and a confidant, creating structure in the classroom, following through again and again with ground rules, and setting the stage for correct treatment of the environment and each other.  It is tiring work to be sure, but sticking to the difficult work at the beginning of the year really pays off.

For the first two weeks I pulled out over 25 different manipulative works and had several shelves dedicated to them just to give myself a pulse on the room and where the children were.  They used these works with gusto.  It has really helped to have only manipulatives in retraining the children to become careful with their work, return the work ready for another child to use, walk around and not through rugs, walk in the classroom in the first place, respect when a child has already chosen a work and not to disturb them etc.  This is certainly an ongoing process.  It seems like it can take an entire year for some of the younger children not to walk on their neighbor's rug if something grabs their attention.

During the third week I noticed that the older children were bored with the manipulatives so I began giving lessons.  Some of the record keeping was spotty so I had to test out to see where they really were in the different areas.  On Thursday, this week (being the 4th week of school), we noticed that it was 2 hours into our work time before any child chose a manipulative work.  YIPEE!  I only have one shelf of manipulatives now, and only the ones that the children find the most interesting.

These are some images from our last week of work.

Exploration of Metal Insets by a returning student


Mouse House turned into a Spanish Work.  Es el raton debajo de la casa anaranjado?

Hanging Bead Stair

Writing Words using the Large Moveable Alphabet

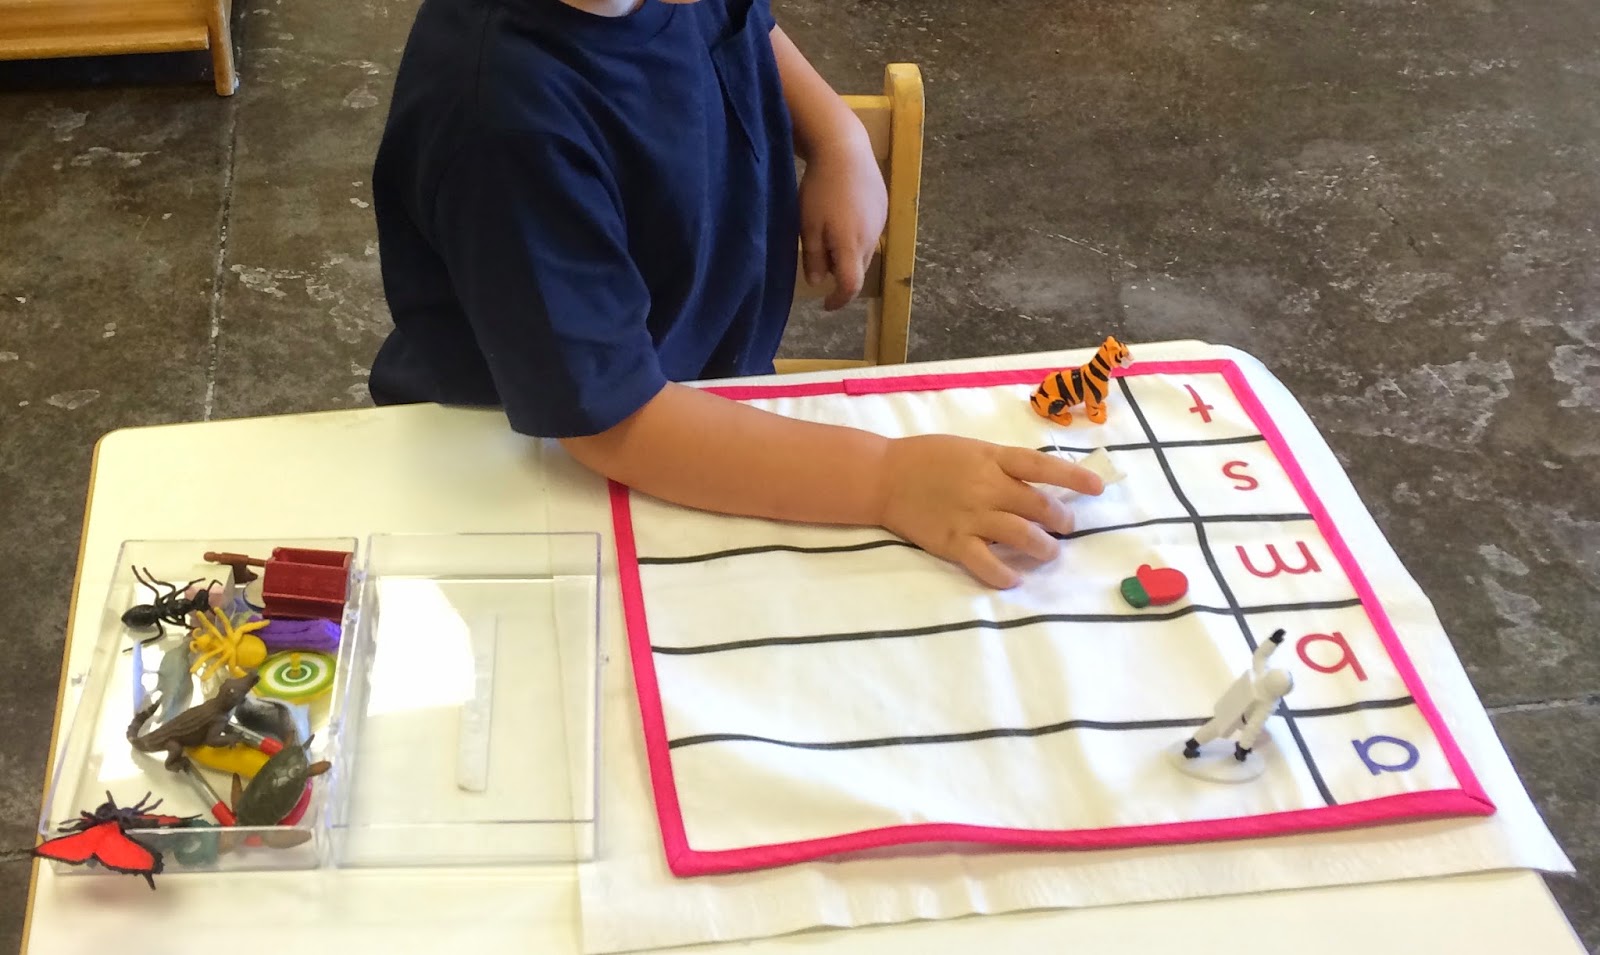
Initial Sound Object Sort - This is the Pink Mat
I am so excited to have these new mats.  I handmade the set I
have been using and just got these new ones this week.

Gluing noodles on apples work.  Next week we will paint these works.
This allows the work to be done in more than one step but still follow
the Montessori rule that art should be a shelf work.

Parts of the Plant Nomenclature Cards.  This child completed this work
 beautifully and could even tell me every part of the plant and later the
Fruit.  He then made the booklets for each work.

Rainbow Rings.  My children LOVE this work.  It is actually
Wine Glass Markers that I found at a kitchen store in Park City.

Using Clay Lesson.  You can see how the little one is using
his "watching arms" during this presentation.

Parts of the Snail Puzzle.  We wouldn't usually have this work
out right now, but this child found a snail in the school
garden and was really interested so I pulled it out.

Weaving with ribbons

Parts of the Flower Puzzle

Parts of the Fruit Nomenclature Cards and Magnetic Parts Puzzle 
Baby Spooning Stars.  This work is pretty challenging for this child.
She has been with me since last year and has needed this long to
be ready for this work.

Sandpaper Letters with Initial Sound Booklets.
This child was successful at all the letters in the first
set and was subsequently hiding them in the
classroom to then find them again.

Hand Transferring.  I just have to say how much I love the
elliptical shape of these wooden bowls.  There are mung beans
inside.  They sound just like rain when they hit the
wood.  Many times the child will remark about this when
they first have this lesson.

Object to Object Sorting with two Space Toobs.  Because I
have so many boys I have geared some of the Pre-reading
works to pull them in.  We are also beginning the year by
learning about our place in the universe.
The Farm Mat - a grammar work.  I made this mat as well.

Monday, May 7, 2012

Beginning Sound Picture Discs

Beginning Sound Picture Discs
click on picture to link to file

Beginning Sound Picture Discs include the following:

  • One disc with the focus letter in lowercase
  • Seven discs with corresponding pictures
  • each page has a list of the included pictures
Instructions for use:
  • Print all of the sheets on white cardstock
  • Cut out all the discs and laminate
  • Separate by letter - or create a more advanced sorting activity with 2 or 3 letter sounds

The circular shape of the discs is different and inviting for the children.  I have used yellow to denote that this is not a pink reading exercise, but that it comes BEFORE pink reading.

PRESENTATION:
  • Bring a couple of children to the rug
  • Use one set of picture discs for the first presentation
  • Say, "This is called the Beginning Sound Picture Discs.  Can you say Beginning Sound Picture Discs?"
  • Take the picture disc with the focus letter out of the basket or container and place on the top of the rug
  • Say, "This is _____(letter sound), what is that?"
  • Take the first picture and lay underneath the letter disc and say, "This is a (lantern).  What sound do we hear at the beginning of the word (lantern) - emphasize the beginning sound of the word.
  • Say, "Let's see if this is the right sound."  Point to the letter disc and say it's sound two times, then point to the object and say it's name.  "Does (lantern) begin with (lll)?  Yes.  We will put the (lantern) under the (lll)."
  • Continue the same way for each picture disc in the group
  • Return all work to the correct place on the shelf
This little group of picture discs is a great way to help children recognize initial sounds.  Children do gravitate to this work because the pictures are enjoyed by them.  They also like to do this in pairs after they have had the presentation.

After children are comfortable with these presentations, it can be very fun to take pictures from other letter sets and place in the set.  Then during presentation it becomes a funny thing.  Just like this:

  • Present just as the in the first presentation  
  • When you get to the picture of the object that DOES NOT begin with the focus sound say, "This is a (watermelon).  What sound do we hear at the beginning of the word (watermelon)?
  • Say, "Let's see if this is the right sound."  Point to the letter disc and say it's sound two times, then point to the object and say it's name but with the focus letter sound in place of the initial sound (lllatermelon).  The children think this about the funniest thing that has happened in their entire day. (In the beginning I frequently need to help them understand the humor of what has just happened.  Anytime an adult puts their hand up to their face and giggles, it is a big deal)
After a while they become experts on whether or not something belongs to the group or not.  After they become more comfortable I no longer need to go through the longer presentation, but can instead just say:
  • This is a (bear).  Does it begin with the (lll) sound? (pointing to the focus letter)
  • The children will be able to tell if it is correct, and LOVE trying it out anyway because it will make a funny word. (caution - you will need to make sure that you do not put things like the picture of a duck in a suspect pile to avoid being shocked :))
For more advanced work I will take 3 full sets as follows:
  • I mix up and pass all the discs except the sound discs out to all the children in the group (this can be done with a larger group of about 5 to 7 children)
  • I place the sound discs at the top of the rug so that they can make 3 columns that will descend from the discs
  • We review the sounds that we are working on
  • I ask the first child to decide which letter he wants to try his picture with.  We place the picture ABOVE the letter disc to show it is being tried.
  • Once he has placed his picture of the disc, the group will check to see if his placement is correct.
  • If it is not correct I will ask him where he would like to try this time and so on until he can find the correct column
  • Once the correct column is found the picture is placed UNDER the letter disc
  • We continue around the room until all of the picture discs are placed in the correct column

I also LOVE to do this work with objects.

Tuesday, April 3, 2012

Initial Sound Cards

This is a set of Initial Sound Cards for teaching even very young children.  You can take a small toddler, or an older child, on your knee or lap to use these cards.  I have laminated my cards for durability, but you can just as easily use sheet protectors. This document will look best printed in grayscale (the letter u page does have one red circle to denote the udder).

These cards will have many images that are unfamiliar to the child.  This will enrich their vocabulary and can help you begin talking about interesting things with the child.  Undoubtedly children will have favorite pictures that they will want to return to time after time.

Something to make note about these cards is that I have taken pains to make sure that the sound is isolated.  This means that when I have a letter such as an 'S' I want to use words that have that sound followed by a vowel sound.  I do not use words such as swan or snail, because the s sound is not isolated in that word.  I have also searched a long time to make it possible to have the initial vowel sounds (a,e,i,o,u) be purely phonetic.  This will help eliminate confusion for little ones having their first introduction to sounds.  All children who are learning to read can benefit from these cards.

On the bottom of each page is a list of the pictures on that page.

Presentation:

  • sit the child on your lap or in a comfortable spot where viewing and pointing to the card is easy for you
  • point to the letter and say the phonetic sound (i.e. the a says it's short sound like in apple, not it's name), then point to the first picture on the page and say its name
  • point again to the letter and say the phonetic sound, then point to the next picture and say its name etc through the whole card
  • encourage the child to say the sound and the name of the picture after you, and when capable with you
  • only continue this work for as long as it is interesting and fun for the child
Initial Sound Cards
click on picture to link to file
 

Monday, January 30, 2012

Montessori Ocean Animals Matching Game

A couple of weekends ago I created this matching game using the coral reef toob 
and a couple of other vinyl animals I had hanging around.  There is a photo of the animal and a space to put the matching animal replica.  I printed off each card then cut out and laminated them for durability.  (The shark and crab came from another manufacturer)

Coral Reef Matching Game
click on picture to link to file
 
Completed work in a basket

Coral Reef Matching work laid out


Monday, January 16, 2012

Fruit Matching Game

This is the fruit version of the Vegetable Matching Game.  Some of the fruits represented are not seen frequently by children so you may want to do a naming lesson before using.

You could choose to create some dishes with the fruits that are not well known to peek their interest in unknown fruits.

There are 6 playing cards with 6 photos of an isolated fruit on it.  The child or small group of children will match the fruit with the matching card.  Ways to play include the following:


  • each child gets a playing card, and the corresponding matching cards to match their own cards
  • each child gets a playing card, and draws from a reservoir of matching cards face up on the rug or in a basket
  • each child gets a playing card, and draws from a reservoir of matching cards face down on the rug
  • one child uses two or more playing cards to match from a basket of matching cards
  • one child uses all of the playing cards to match from a basket of matching card
Fruitimatch Game
click on picture to link to file

To create this game:
  • print off one of each page 1-6
  • cut out each playing card and each of the corresponding matching card
  • place corresponding stickers on the back of a playing card and the matching cards to aid in keeping correct cards together
  • laminate everything
  • place in a basket
*Here is a guide to the playing cards

Guide to Fruitimatch
click on picture to link to file
 

Saturday, January 14, 2012

Vegetable Match Game

This free download is a fun game for young children.  Some of the vegetables represented are not seen frequently by children.  It is a great springboard for conversation, to talk about where the vegetables come from, and add to a young child's vocabulary.   - You could even use the cut out matching cards in part of a continents box to show the origins of foods.

You can also create some dishes with the vegetables that are not well known.  Children are more likely to try new things when their interest has been peeked.  If you allow the child to help in the preparation of the dish they will be even more likely to enjoy the dish.

For these cards I have used the 'culinary' definition of vegetable.  If in the kitchen the item is used to prepare a savory dish, it is called a vegetable.  Pumpkin can go both ways, so I decided to use it in vegetable along with other squashes.

There are 6 playing cards with 6 photos of an isolated vegetable on it.  The child or small group of children will match the vegetables with the matching card.  Ways to play include the following:

  • each child gets a playing card, and the corresponding matching cards to match their own cards
  • each child gets a playing card, and draws from a reservoir of matching cards face up on the rug or in a basket
  • each child gets a playing card, and draws from a reservoir of matching cards face down on the rug
  • one child uses two or more playing cards to match from a basket of matching cards
  • one child uses all of the playing cards to match from a basket of matching cards
You could certainly create more ways to use this work.  When this game is used cooperatively it will be the funnest of all.  I stay away from competition in my classroom, and strive to help children learn that by working together and helping each other we truly all win.
Veggimatch Game
click on picture to link to file
    
To create this game:
  • print off one of each page 1-6
  • cut out each playing card and each of the corresponding matching card
  • place corresponding stickers on the back of a playing card and the matching cards to aid in keeping correct cards together
  • laminate everything
  • place in a basket
*Here is a guide to the playing cards
Veggimatch Guide
click on picture to link to file
 

Thursday, January 12, 2012

Flower Matching Cards

This little set of flower matching cards is a good set for non-readers and readers alike.

There are 18 different kinds and colors of flowers represented in this free set.

In order to create this set:


  • Print one copy of each page - one set will be large and one will be small
  • Cut out the matching cards
  • You could color code the back of each set for self correcting if desired
  • Laminate the matching cards
  • Place in a small basket
  • Give a short naming lesson for the cards
UPDATE!!! - file has been updated to include flower names with cards.

Flower Matching Cards
click on picture to link to file
 

Thursday, January 5, 2012

Fruit and Vegetable Matching Cards

This set is great for children who are not yet reading.  They can help to build vocabulary and awareness of the child's world.

This file includes A LOT of different fruits and vegetables.  54 in all.  This means that you can have some choices about which fruits and vegetables are available for the child to use at a given time.  This also means that this work is interesting for a longer time.

I would limit the number of available cards to about 15-20 pairs.

In order to make this work:

  • Print two copies of each page
  • Cut out the matching cards
  • You could color code the back each set for self correcting if desired
  • Laminate the matching cards
  • Place in a small basket
  • Give a short naming lesson for the cards that will be available first
  • Give a short naming lesson when cards are changed
Fruit and Vegetable Matching Cards
click on the picture to link to file