A gorgeous set of Cosmic Nesting Boxes can be found here as well as the Cosmic Nesting Box Lesson as a free download. The child gains a greater understanding of where they belong in the universe. It can somehow be grounding for little children to have this information, and to use the boxes over and over again. I have seen the cosmic nesting boxes used as a reference when creating stories during writers workshop.
I have wanted this set for my classroom, but did not want to spend the $85 for them. Now that I have finished with this project I believe I love these boxes much more than I ever would the pre-made set.
I spent a long time during the school year looking at thrift stores for a set of nesting boxes but never could find a set. I ended up getting a cheap Melissa and Doug alphabet set for $10 on Amazon and spray painting them black. It took several coats to cover the previous images entirely. I also used the extra coats of paint since children will use them.


You can see my 10 year old's bike helmet in the background :)
Next I printed off images of the following to paint on the boxes:
- Galaxy - largest box
- Solar System
- Earth
- North America (since that is where we live)
- United States
- Utah
- West Valley City (since that is where our school is located)
- Dancing Moose (since that is our school)
- A Boy and a Girl
- An Atom (to represent the energy in the child) - smallest box
I traced the outline of each image onto the respective box and filled in the lines with white paint to help the images show up better on the black background.
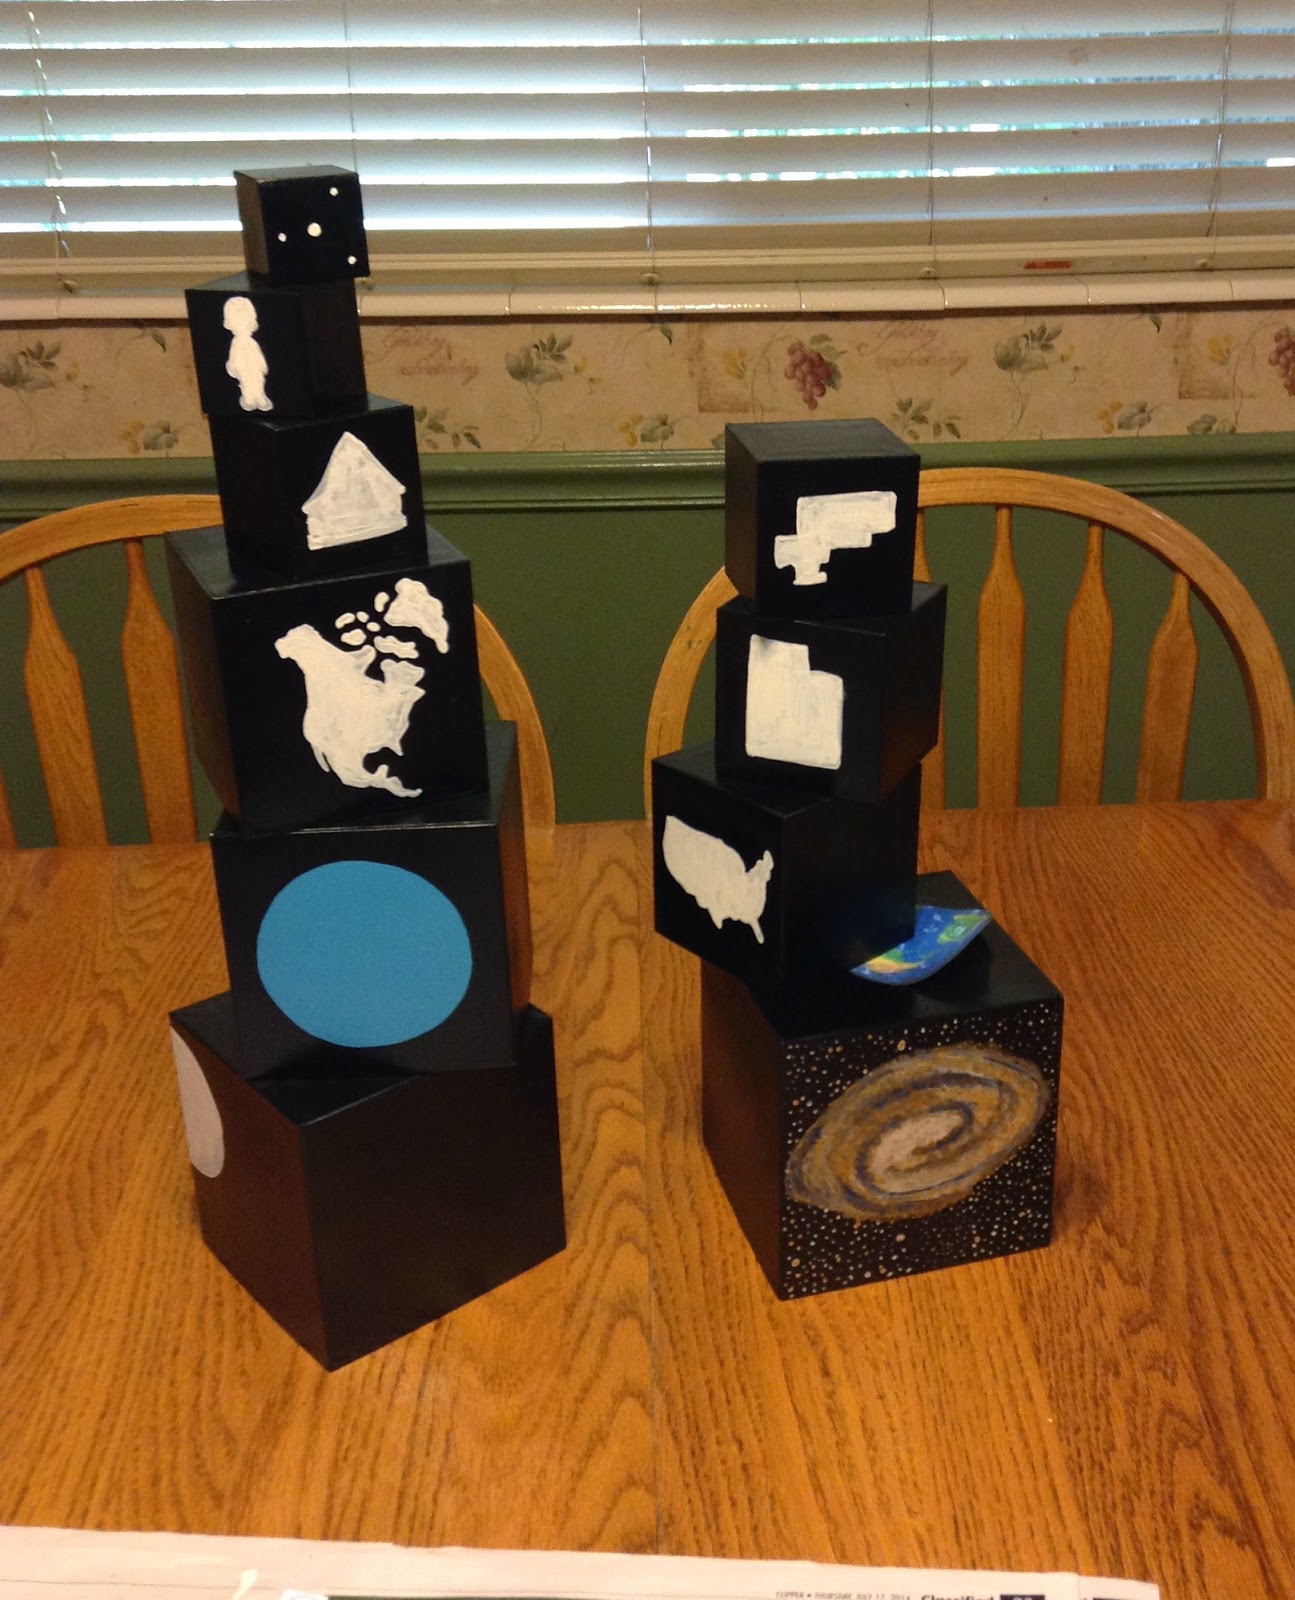
This image shows the galaxy already finished as well as the water for the earth filled in. The rest of the images are just filled in with white.
I choose to make the images the same colors as the Nienhuis maps. These are the same colors used in our classroom.

Once I was finished painting all the fronts of the boxes I let them dry for a day and then sprayed many, many coats of clear coat varnish on them. I really love them and I know that it may very well be because I did them myself. Even so, they are beautiful. I will place them in a lovely basket with an ecru cloth liner when it is time to put them out on the shelf.
I am certain that the children will really take to them. I am most interested in how long the children will be interested in choosing them from the shelf after our lesson and, subsequently how well they stand up to use during this year. I may find myself needing to make another set from sturdier material at the end of the year.
This project probably ran me around $20 with boxes, paint and varnish.
Those look SOOO wonderful! Our cosmic nesting boxes are made out of Melissa & Doug boxes too! I'm going to add a link to your blog post to my blog post to make sure people get over here to check these out before they do it the way I did it. Yours are prettier :) http://whatdidwedoallday.blogspot.com/2014/01/biosphere-nesting-boxes-parts-of-biome.html
ReplyDeleteThanks for the link. I love to visit your blog and see the growth of your boys!
DeleteWow, these are gorgeous! I love these, and I can see why you do too! I'm sure they were a labor of love but they really came out so lovely. I hope your kids get a ton of use out of these!
ReplyDeleteYayyyy! You're back! I began to worry something had happen....so glad to see you are back to share all the wonderful things you're doing :) You're blog and printables have been a lifesaver to our school :)
ReplyDeleteI am glad to be back as well. I have been so incredibly busy during this last year that finding an opportunity to post has been beyond difficult. I am happy to say that I am back to posting.
ReplyDeleteI'm so glad you're back too!!! Beautiful boxes!!
ReplyDeleteThat is beautiful!
ReplyDeleteWhat a great idea. Did you leave all the other sides of the cubes black?
ReplyDeleteYes. All the other sides were left black.
DeleteDid you paint all of the images freehand or did you use templates? They are beautiful!
ReplyDeleteThey were free-handed, with a little help. I printed out what I wanted on card stock and cut out the borders. I then traced around the border onto the boxes. From there I free-handed the paintings.
DeleteThank you for the compliment. I have been considering making them from wood and selling them.
I love you your blog!
ReplyDelete